Troubleshooting Common Sublimation Problems: Faded Prints, Ghosting, and More
Troubleshooting Common Sublimation Problems: Faded Prints, Ghosting, and More
Sublimation printing is a rewarding craft, allowing you to create stunning, permanent designs. However, like any creative process, you might encounter a few hiccups along the way. Don’t let common issues like faded prints or ghosting discourage you! Most problems can be easily diagnosed and fixed with a little knowledge and adjustment.
This guide will walk you through the most frequent sublimation problems, explain why they happen, and provide practical solutions to help you achieve perfect transfers every time.
1. Faded or Dull Colors
This is one of the most common complaints, where the final print lacks the vibrancy you see on your computer screen or the initial printout.
- Why it happens:
- Not enough heat or time: The ink didn’t fully convert to gas and penetrate the blank.
- Too little pressure: Insufficient contact between the paper and the blank.
- Low polyester content: For fabrics, the blank might not be 100% polyester, meaning the ink has fewer fibers to bond with.
- Poor quality paper/ink: Inconsistent ink release or weak color formulation.
- Incorrect ICC Profile: The printer’s color management isn’t properly calibrated for sublimation ink.
- Moisture in the blank: Excess moisture can interfere with the ink’s gassing process.
- Solutions:
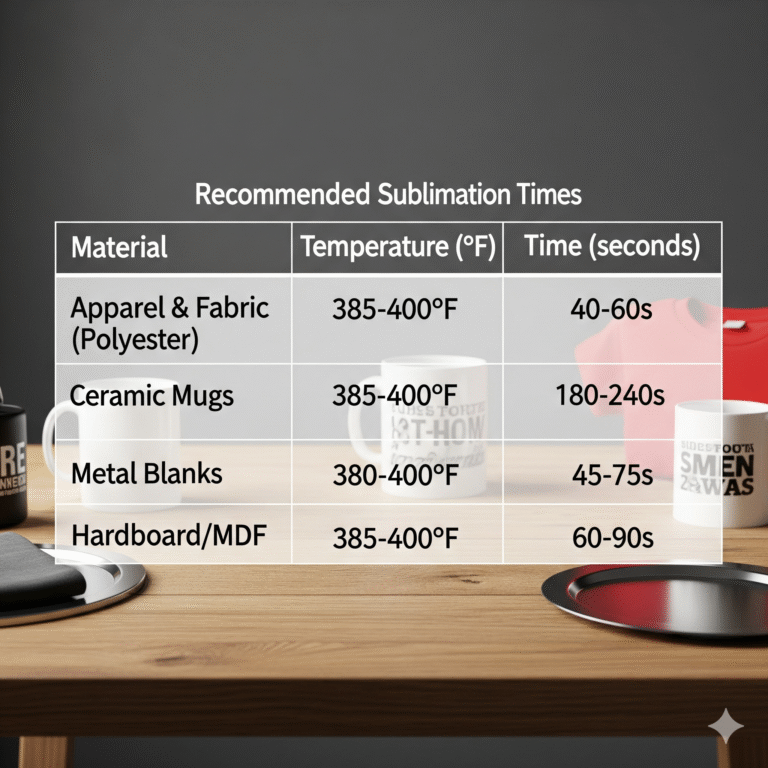
- Increase Temperature/Time: Refer to the blank manufacturer’s recommended settings. If in doubt, increase temperature by 5-10°F or time by 5-10 seconds on a test piece.
- Increase Pressure: Adjust your heat press to ensure firm, even contact.
- Check Blank Material: Ensure you’re using sublimation-ready blanks (100% polyester for fabric, polymer-coated for hard surfaces).
- Use Quality Supplies: Invest in reputable sublimation paper and ink.
- Install ICC Profile: For converted printers, install and use the correct ICC profile for your specific ink and printer model.
- Pre-press Blanks: Lightly press your blank for 5-10 seconds before applying the design to remove moisture.
2. Ghosting or Blurry Images
Ghosting appears as a blurry, double image, or a faint shadow around your main design.
- Why it happens:
- Paper Movement: The sublimation paper shifted during the pressing process. This is the most common cause.
- Early Opening of Press: Lifting the heat press too quickly or abruptly can cause steam to escape, moving the paper.
- Gassing Out: Steam created during the process gets trapped and moves the paper.
- Design Not Mirrored: (This isn’t ghosting, but a common cause of blurry text/images).
- Solutions:
- Secure with Heat-Resistant Tape: Always use high-quality heat-resistant tape to firmly secure your sublimation paper to the blank.
- Patience When Opening: Lift the heat press slowly and smoothly.
- Use Adhesive Spray (Temporary): A temporary adhesive spray for fabric can help hold the paper in place.
- Use Tacky Sublimation Paper: This paper has a light adhesive that sticks to the blank when heated, significantly reducing ghosting.
- Always Mirror Your Image: Double-check your print settings to ensure the image is mirrored before printing.
3. Lines or Strips in the Print (Head Clogs/Bandings)
These appear as unprinted lines, streaks, or horizontal bands across your design.
- Why it happens:
- Clogged Print Nozzles: Dried ink is blocking the nozzles in your printer’s printhead. This is very common with sublimation ink, which can dry quickly.
- Low Ink Levels: One or more ink tanks are running low.
- Dirty Encoder Strip: A dirty strip inside the printer can cause misaligned printing.
- Solutions:
- Perform a Nozzle Check: Print a nozzle check pattern from your printer’s utility menu. This will show you which nozzles are clogged.
- Run a Head Cleaning: Perform 1-3 head cleaning cycles through your printer’s utility menu.
- Power Cleaning (Last Resort): If standard head cleanings don’t work, some printers offer a “power cleaning” cycle, but use sparingly as it consumes a lot of ink.
- Print Regularly: Print at least a small test pattern daily to keep ink flowing and prevent clogs.
- Check Ink Levels: Ensure all ink tanks are sufficiently filled.
- Clean Encoder Strip: Carefully clean the transparent encoder strip inside the printer with a lint-free cloth and distilled water.
4. Uneven Transfer / White Spots / Missing Areas
This occurs when parts of your design don’t transfer fully, leaving unprinted areas or white spots.
- Why it happens:
- Uneven Pressure: The heat press isn’t applying consistent pressure across the entire surface.
- Cold Spots: Your heat press has areas that don’t reach the target temperature.
- Dust/Debris: Small particles on the blank or print before pressing.
- Wrinkles in Fabric: Folds or creases prevent full contact.
- Solutions:
- Adjust Pressure: Ensure your heat press is leveled and applying even, firm pressure.
- Rotate/Check Heat Plate: If using a manual press, ensure you’re pulling the handle down squarely. For larger presses, check if the platen is calibrated correctly.
- Thorough Cleaning: Use a lint roller or clean cloth to remove all dust and debris from your blank before pressing.
- Pre-Press Fabrics: Always pre-press garments to flatten wrinkles and remove moisture.
5. Yellowing or Scorching on Fabric
- Why it happens:
- Too Much Heat or Time: The polyester fibers are literally burning or yellowing from excessive exposure.
- No Butcher Paper: Not using a protective layer can lead to the blank sticking to the heat platen or residue from previous presses transferring.
- Solutions:
- Reduce Temperature/Time: Lower the heat by 5-10°F or decrease the time by 5-10 seconds.
- Use Protective Layers: Always use a fresh sheet of butcher paper (or thin parchment paper) between your heat platen and the sublimation paper, and often inside the garment as well, to protect from ink bleed-through and scorching.
- Quick Peel: Remove the sublimation paper immediately after pressing (while hot) to prevent re-gassing of ink.
Remember, every sublimation setup is unique. Don’t be afraid to experiment, keep detailed notes on your settings, and consult your blank manufacturer’s recommendations. With a bit of practice and these troubleshooting tips, you’ll be creating flawless sublimation projects in no time!